Introduction
A DNS leak can silently undermine your privacy even when you’re using a VPN. It’s one of those less‑known threats that can expose the websites you visit to your ISP or third parties—despite encryption. In this detailed guide, you’ll learn:
- What exactly a DNS leak is and why it matters
- How VPN apps may fail to prevent leaks
- Simple tools and tests to detect DNS leaks
- Step-by-step fixes across Windows, macOS, Linux, Android, browser settings, and routers
- How to choose a VPN that protects you by design
This article is designed to be actionable, SEO‑friendly, and rich in subheadings so you can scan, learn, and implement quickly.
What Is a DNS Leak?
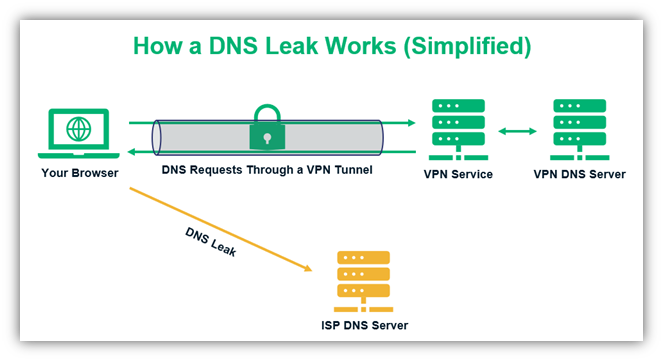
A DNS leak occurs when your DNS (Domain Name System) requests bypass your VPN tunnel and instead go through your ISP’s DNS servers. This exposes the websites you visit—even though your IP address may remain hidden.

As Reddit users describe:
“A DNS leak is when you’re connected to a VPN but you’re still using your normal DNS server, usually belonging to your ISP.”
In simpler terms: your OS sends DNS queries outside the VPN tunnel, revealing your browsing activity despite using a VPN.
Why Does a DNS Leak Matter?
- Exposes the domain names you visit (e.g. news sites, streaming services)
- Reveals your approximate location and ISP
- Undermines the very purpose of VPN privacy
- Can happen silently unless tested
According to Recorded Future:
DNS leaks are a security flaw that allows DNS requests to be revealed to ISP DNS servers… despite the use of a VPN
How DNS Leaks Happen
Common Causes
- Poor VPN client configuration
Not all VPN apps automatically override the system DNS settings. - Operating system behavior, especially Windows 8+
Windows may send DNS via all available interfaces (Smart Multi‑Homed Named Resolution), bypassing the VPN. - Split‑tunneling misconfiguration
Traffic meant for DNS queries might go via the local interface instead of VPN tunnel. - Browser-based “secure DNS”
Browsers like Chrome or Firefox may use DNS over HTTPS/TLS that points to external resolvers—causing leaks. - Third-party software interference
Some anti‑virus, firewall or DNS‑hijacking apps (like Avast RealSite, Portmaster) can override DNS settings. - Router-level leaks
Misconfigured VPN on routers or improper DNS override can expose traffic.
How to Detect a DNS Leak
Use Reliable Leak‑test Sites
Try these:
- dnsleaktest.com
- ipleak.net
- browserleaks.com (for WebRTC plus DNS)
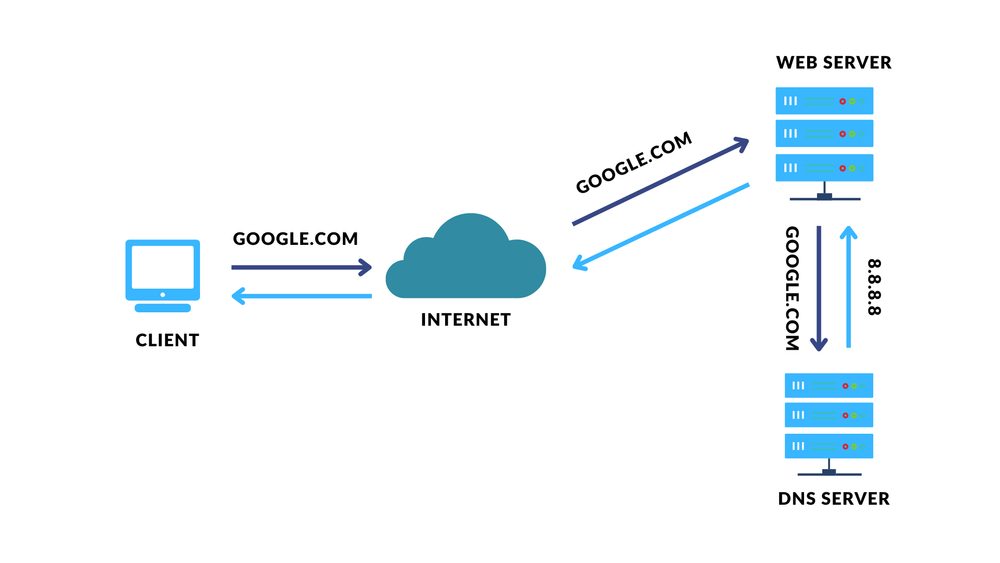
How the test works:
- DNS‑test tool sends queries from your device
- It shows which DNS servers responded
- If any server belongs to your ISP or your real location—leak detected
Interpreting the Results
- If VPN provider’s DNS servers show up → safe
- If ISP DNS or local DNS appear → DNS leak
- Mixed geolocation results → potential leak
How to Fix a DNS Leak
General Principles
- Use only VPN provider’s DNS servers while connected
- Disable all other DNS endpoints at OS or browser level
- Flush your DNS cache after making changes
Fixes by Platform
Windows 10/11
- Connect your VPN
- Open Command Prompt (Admin) → run: bashCopyEdit
ipconfig /flushdns - Open Network Connections → Properties of Wi‑Fi or Ethernet adapter
- IPv4 → Advanced → DNS tab → add
0.0.0.0to override unwanted DNS - (Optional) Disable IPv6 DNS: under IPv6 properties → set DNS to
:: - Disconnect VPN → revert DNS to “Obtain DNS server address automatically” → flush cache again
macOS
- Network Preferences → select connection → Advanced → DNS tab
- Remove all DNS entries unless VPN‑provided
- Terminal command to flush cache: goCopyEdit
sudo dscacheutil -flushcache; sudo killall -HUP mDNSResponder ``` :contentReference[oaicite:60]{index=60}
Linux
- Check current DNS via
digornslookup - Open
/etc/resolv.confand remove any non‑VPN line - Replace with VPN provider’s DNS
- Save changes and restart network manager or systemd DNS
Browsers (Chrome, Firefox, Brave, Edge)
Browser “secure DNS” can bypass VPN. Turn it off:
- Chrome / Brave / Opera: Settings → Privacy & security → Security → Disable “Use secure DNS”
- Edge: Settings → Privacy, search, and services → Security → Turn off secure DNS
- Firefox: Settings → Privacy & Security → disable “Enable secure DNS”
Android
Android 9+ has Private DNS (DoT) and system captive-portal checks that may bypass VPN:
- Settings → Network & Internet → Private DNS → Set to “Off”
- For VPN apps like Mullvad or AirVPN that offer “VPN Lock” or always‑on VPN → enable it to avoid leaks
Router‑based VPN
On routers (OpenWrt, GL.iNet, etc.):
- Disable “Use DNS servers advertised by peer” if grabbing ISP DNS
- Enable “Override DNS settings of all clients” so router intercepts port 53 requests and forces VPN DNS
Advanced Tips & Troubleshooting
- Firewall rules: block UDP/TCP outgoing port 53 on physical interfaces. Only allow DNS via VPN interface.
- Disable IPv6 if VPN doesn’t handle IPv6 DNS (can leak).
- Update VPN client & firmware: older versions may lack proper leak protection
- If leaks persist: contact VPN support, ask whether DNS leak protection is built in (some providers, like Mullvad, Private Internet Access, TorGuard provide this).
Choosing a DNS‑Leak‑Safe VPN
When shopping for VPNs, look for:
- Built-in DNS leak protection
- Operates its own DNS servers
- Offers kill switch / full tunnel enforcement
- Supports IPv6 correctly
- Clear settings to disable split‑tunnel or force all traffic through VPN
Some VPNs known for robust DNS leak defenses include Mullvad, ExpressVPN, Private Internet Access, NordVPN, TorGuard, Surfshark. But always test each individually.
Summary Table: DNS Leak Fix Checklist
| Step | Action |
|---|---|
| 1 | Connect VPN and enable DNS leak protection in app |
| 2 | Disable browser secure DNS / DoH |
| 3 | Remove non‑VPN DNS entries in OS network settings |
| 4 | Flush DNS cache (Windows/macOS/Linux) |
| 5 | Disable IPv6 if unsupported |
| 6 | Use firewall/router rules to enforce DNS through VPN |
| 7 | Test again with dnsleaktest.com or similar |
| 8 | Repeat test after reconnecting VPN or changing networks |
| 9 | Contact VPN support if leaks persist |
Common Questions: FAQ
1. What is the difference between a DNS leak and an IP leak?
A DNS leak exposes only the domains you visit via DNS requests, while an IP leak reveals your real IP address. Both can compromise privacy, but DNS leaks are easier to test and fix.
2. Will using DNS-over-HTTPS (DoH) protect me?
Actually, browser DoH can cause leaks—because it may bypass the VPN’s DNS servers. Disable DoH in your browser settings when using a VPN.
3. Does flushing the DNS cache stop leaks?
Flushing clears stale entries, which helps if your system still refers to old DNS settings. But you must also override DNS settings to use only VPN DNS.
4. Is IPv6 DNS leaking a problem?
Yes. Many VPNs don’t fully support IPv6, so DNS requests may leak via IPv6. Disabling IPv6 in your network settings can prevent this.
5. How often should I test for DNS leaks?
Test each time you switch VPN servers, change networks (Wi‑Fi to cellular), update VPN software, or modify system DNS settings. Regular testing is key to privacy.
6. Can using a public DNS (e.g. Google DNS) help prevent leaks?
Using public DNS can be more private than ISP DNS, but still leaks data to that provider. The safest option is using your VPN provider’s DNS servers within the VPN tunnel.
7. Do mobile VPN apps protect against DNS leaks?
Many mobile VPN apps now offer leak protection. On Android, ensure you enable “always-on VPN” and disable Private DNS; on iOS, similar settings exist in VPN app permissions.
8. What if I continue to see ISP DNS servers after fix steps?
Likely your VPN app doesn’t enforce DNS routing or OS settings override it. Contact your VPN’s support team and request instructions or an updated client.
Conclusion
DNS leaks are a hidden but powerful privacy threat. Even when your IP appears masked, DNS queries can expose the websites you visit—including streaming habits, forums, downloads, and sensitive topics.
By following this guide:
- You understand what DNS leaks are and why they matter
- You can detect leaks using trusted tools
- You know how to fix leaks on major platforms (Windows, macOS, Linux, Android, routers)
- You can choose leak‑protecting VPNs and enforce secure DNS via settings or firewall rules
Privacy isn’t automatic—testing and proper configuration are essential. Be proactive, stay safe, and let VPN AdWiser guide you to better VPN choices and no DNS leaks.